|
Main Page
Hidden Gems
Sources of
Service
Articles
Tutorials
Application Tips
The Three P's
Chapter Registrars
Workshops
Lineage Societies
Contact Debbie
|
 |
|
|
|
|
Articles |
|
|
|
|
|
 |
|
 |
Below are a number of informative articles by Debbie Duay,
copyright © 2009 - 2024.
Debbie Duay, Ph.D.
debduay@yahoo.com |
|
|
|
|
|
|
Debbie's Process for Finding a Patriot for
Prospective Members |
|
|
|
|
|
Click here to watch a video
presentation of this article.
My process for finding a Revolutionary War patriot with
information from my
Genealogy Worksheet
is described below. (If you are a DAR member interested in
finding a patriot for a supplemental application,
read this article.)
There are
5 important
tools in this process.
Step One
- I almost always require that a prospective member
complete a Genealogy Worksheet with as much information as she
knows on her parents, grandparents, and great-grandparents on
BOTH sides of her family. The only time I do not ask a
prospective member to complete a Genealogy Worksheet is when she
has a close family member in the DAR (i.e., mother, daughter,
sister, grandmother, aunt, niece, or great-aunt). I never
assume that the patriot the prospective member has identified
will be the easiest patriot to prove. Often, it is just
the first patriot that she has found.
Step Two
-
If a prospective member has listed her great-grandparents on the
Genealogy Worksheet, I start with them. I enter each
great-grandparent couple into the
DAR Descendants Database Advanced
Search
page. (NOTE: Use the Advanced Search page rather
than the Simple Search page as the Simple Search does not allow
you to list a spouse.) Unlike the DAR Ancestor Database which
lists patriot ancestors only, the DAR Descendants Database is
composed of all of the lineages starting with great-grandparents
(Gen 4) through the patriot ancestor. Please note that
you MUST put the husband's name in the top fields and the wife's
maiden name where it says spouse when using the DAR Descendants
Advanced Search page. Usually, I simply type the husband's
last name only and the wife's maiden name only (no first names)
to minimize problems with variations in spelling. For a
demonstration on how to use the DAR Descendants Database
Advanced Search,
click here.
Occasionally, I get a hit immediately in the DAR Descendants
Database
because the prospective member's great-grandparents are
listed on another DAR application. More often, I have to do
more research.
Step Three
- Print out a
5-Generation Genealogy Chart
for each of the prospective member's great-grandparents born in
the United States. If all of her great-grandparents were
born in the United States, print out eight (8) 5-Generation
Charts. Print a chart on the front and back of a sheet of
paper so that you use 4 sheets of paper rather than 8 sheets.
Write the name of each great-grandparent in the 1 box on each
chart. If you printed a chart on the front and back of
each sheet of paper, write the husband's name in the 1 box on
one side of the sheet and the wife's name in the 1 box on the
other side of the sheet.
Step Four
- Next, I identify the parents of each of the
prospective member's great-grandparents. To do this, I
go
to the
Public Member Trees Database on Ancestry.com. I
enter the great-grandparents to see if I can connect to anyone's
research that will take me back one or more generations.
Step Five
- If I am successful and I connect to someone's research in
the Public Member Trees Database, I come
back to the
DAR Descendants Database Advanced
Search page and enter the husband and wife in
each and every generation
in the prospective member's lineage. If you printed out a
5-Generation Chart for each great-grandparent (Gen 4), enter the
information about their parents (Gen 5), grandparents (Gen 6),
etc. on the 5-Generation Chart as you discover it. NOTE:
Be extra careful using the Public Member Trees Database
on Ancestry.com as there are MANY ERRORS.
Step Six
- If I don't find anything in Ancestry's public trees, I go to the census on
Ancestry.com. I look for the
great-grandparents in their parents' household. Once I
find the great-great-grandparents (Gen 5), I immediately go back
to the
DAR Descendants Database Advanced
Search page to see if a previous application
lists them. If I do not get a match in the DAR database, I
go back to the Public Member Trees Database and enter the
great-great-grandparents. Usually I am back far enough
with great-great-grandparents to find another person's research
that takes me back several more generations.
In essence, my process for finding a Revolutionary War patriot
is an iterative process between the
DAR Descendants Database Advanced
Search and the
Public Member Trees Database on
Ancestry.com. |
|
|
|
|
Debbie's Process for Finding a Patriot for
Supplemental
Applications |
|
|
|
|
|
Begin by filling out a 5-Generation Genealogy Chart with information on as many of your 8 great-grandparents (Generation 4) and 16 great-great grandparents (Generation 5) who were born in the United States as possible. If you do not know all of your great-great grandparents, search the
Public Member Trees Database on Ancestry.com. Perhaps another researcher has uploaded information on your lineage.
Next,
enter each great-grandparent (Generation 4) couple into the
DAR Descendants Database Advanced Search
page. (NOTE: I recommend using the Advanced Search page rather than the Simple Search page as the Simple Search does not allow you to list a spouse.) The DAR Descendants Database is composed of all of the lineages appearing on DAR applications starting with great-grandparents (Generation 4) through the patriot ancestor. Please note that you MUST put the husband's name in the top fields and the wife's maiden name where it says spouse when using the DAR Descendants Advanced Search page. Usually, I simply type the husband's last name only and the wife's maiden name only (no first names) to minimize problems with variations in spelling. For a demonstration on how to use the DAR Descendants Database Advanced Search, click here.
If you are a member who joined more than 18 months ago, your DAR number and Revolutionary War patriot will be included in the results for the great-grandparents listed on your application.
If you do not find any OTHER patriots after trying all 4 sets of your great-grandparents (Generation 4), the next step is to move to your great-great grandparents (Generation 5). Search the
DAR Descendants Database Advanced Search using each of the 8 husband-wife sets in Generation 5 in your family tree. NOTE: It is likely that some of your great-great grandparents were NOT born in the United States. However, if at least one of the people in a husband-wife set was born in the United States, search the DAR Descendants Database on that couple.
Once again your DAR number and patriot will be included in the results for the great-great grandparents listed on your application. If no other patriots appear, the next step is to identify as many of your 32 great-great-great grandparents (Generation 6) born in the United States as possible. Consider starting a new 5-Generation Genealogy Chart for each person in Generation 5 (i.e., 16 charts). On each new chart, write the name and dates of one of your great-great grandparents born in the United States in Box 1. List their parents (Generation 6) in Boxes 2 & 3. If you do not know all of your great-great-great grandparents, search the
Public Member Trees Database on Ancestry.com.
If no other patriots appear after searching on as many of the 16 husband-wife sets in Generation 6 as possible, try to identify as many of your great-great-great-great grandparents (Generation 7) as you can. Search the
DAR Descendants Database Advanced Search with as many husband-wife couples in Generation 7 as possible.
Assuming that a match (other than the patriot already proven on your application) exists in the DAR Descendants Database, the likelihood of discovering a match increases the further back in your family tree that you go. This is because the number of ancestors that you share in common with others increases as you move further and further back in your lineage.
Generally, Revolutionary War patriot ancestors appear in Generations 7, 8, or 9. If no other patriots appear after a search of the DAR Descendants Database using ancestors in Generation 7, it may be necessary to prove a completely new patriot or a new child of an established patriot in order to file a supplemental application. Review the information on Finding a Revolutionary War Patriot in my free online tutorial. If you are proving a new patriot, my sources of Revolutionary War service page may help you identify service for your ancestor.
|
|
|
|
|
A
Simple Strategy for Proving a New Child or
a New
Grandchild of A Patriot |
|
|
|
|
|
Although it does not
always work, there
is a simple strategy
for proving a new
child or a new
grandchild of an
established patriot.
It is worth trying
early in the process
as it may save you
hours of research.
Proving a New Child
of an Established
Patriot
When you are in the
patriot's profile in
the DAR Ancestor
Database, make note
of the applications
that prove a
different child of
the patriot for the
FIRST TIME. If the
DAR number for the
first time a new
child was proven is
less than #400000,
the application will
probably be too old
to be helpful.
However, if the DAR
number is greater
than #400000, the
application may list
a source such as a
will, deed,
county/town history,
or Bible record that
also lists the child
that you are trying
to prove.
For example, patriot
Joseph Witter
(1762-1830) Ancestor
#A127273 has 4
proven children.
Daughter LUCY was
first proven on
#174729 Add Vol 142.
Son JOSEPH was first
proven on #252499.
Son WILLIAM was
first proven on
#716288, and son
Abraham was first
proven on #848671.
The applications for
daughter Lucy
(#174729 Add 142)
and son Joseph
(#252499) are old.
Thus, they probably
do not list any
documentation.
However, the
documentation that
was used to link son
William on #716288
and/or son Abraham
on #848671 to their
father patriot
Joseph Witter may
also mention the
child you are trying
to document.
Proving a New Child of an Established Child of a Patriot (i.e., New Grandchild of the Patriot)
To prove a new child of an established child of a patriot (i.e., new grandchild of the patriot), you will need to review the line of descent by clicking the little purple D for each application that is through the same child of the patriot as the lineage you are trying to prove.
Using the same example (patriot Joseph Witter A127273), let's pretend that our prospective member's lineage is through daughter LUCY and Lucy's son Tobias who has never been proven. After reviewing the line of descent for all 4 applications through Lucy, I find that Lucy's daughter Nancy Lucinda Smith is first proven on DAR #761011, and Lucy's daughter Hannah W. Smith is first proven on #174729 Add 142. Although #174729 Add 142 is probably too old to be helpful, the documentation used on #761011 to link Nancy Lucinda Smith to her parents Lucy Witter and Daniel Smith may also list Lucy's son Tobias.
|
|
|
|
|
Leaving a Legacy:
Documenting the Descendants of
Your
Revolutionary War Patriot |
|
|
|
|
|
Click here to watch a video
presentation of this article.
Most women have absolutely no idea that they are eligible to
join the DAR. Basically, the purpose of this project is to
create a big neon sign that tells our distant cousins that they
are eligible. The project involves creating an
Ancestry.com public tree that documents the
children, grandchildren, great-grandchildren, gg-grandchildren
etc. of your patriots as far down as possible to descendants who
died as recently as 1960 - present. A
critical aspect of this project is marking each direct
descendant with the appropriate designation by typing it in
parentheses after the surname:
(Child
of DAR Patriot)
(Grandchild of DAR Patriot)
(Great-Grandchild
of DAR Patriot)
(GG-Grandchild of DAR Patriot)
(GGG-Grandchild of DAR Patriot)
etc.
Below
are examples
of two Ancestry public trees for Revolutionary War patriots
documented in this manner.
Rebecca Waldron Yates
Benjamin Rice
In
order to participate in this project, you must:
* have an Ancestry.com account
*
create an Ancestry.com PUBLIC tree
* know how to attach documents to your tree
* allow messages through Ancestry's messaging system
There
are several reasons to participate.
*
It is lots
of fun.
*
You will hone your research skills.
* You will discover distant
cousins and help them join DAR.
*
This project will help us reach our goal of 250,000 members.
*
You will leave a legacy for future generations.
Step One:
Start Your Tree with Your Direct Line to Your Patriot
Begin
your Ancestry public tree with yourself, your parents, your
grandparents, your great-grandparents etc. all the way back to
your Revolutionary War patriot. Ancestry.com has two
tutorials for creating a family tree:
Starting Your Tree, Lesson 1
Building Your Tree, Lesson 2
For
yourself, just list your first name and maiden name (no dates
and places), and mark yourself as "Living." If your
parents are still living, do the same for them. For all
deceased Individuals, list birth, marriage, and death dates and
places (if known) and attach documentation from Ancestry and
FamilySearch.
Once
you complete your direct lineage to your Revolutionary War
patriot, mark each individual in the direct line by typing the
appropriate designation in parentheses after the surname.
For example, (DAR Patriot), (Child of DAR Patriot), (Grandchild
of DAR Patriot) etc.
Check Your Ancestry Settings and Update Your Profile
It is
very important that your Ancestry tree for this project is a PUBLIC tree.
Check your Tree Settings to confirm that your tree is
public. (NOTE: If you already have a private tree
that you want to keep private, start a different, new public
tree for this project.) In order to ensure that distant cousins can
contact you through Ancestry's messaging system,
check your
Site Preferences. Finally, consider
updating your
profile so a distant cousin will feel comfortable contacting
you. If you don't feel comfortable adding a picture of
yourself, add a picture of a flower or a kitten or something
nonthreatening to encourage communication.
Step Two: Find the Patriot's Children
Once
you have your direct line to your patriot on your tree, the next
step is to start with your patriot and add all of his/her
PROVABLE children. First, check the
DAR Ancestor Database,
and add all the established children listed on your patriot's
profile.
IMPORTANT NOTE: You will be using the DAR Ancestor and
DAR Descendants Databases a great deal for the early generations
in the lineage. Remember that if a child or grandchild of the
patriot is already approved on a previous DAR application, you
do not have to worry about documenting the parent-child
relationship. This is true even if the application is very
old assuming there is nothing indicating an EL (Error in
Lineage) in the DAR patriot's profile. However, if the
most recent application for a child or grandchild of the patriot
is very old and does not list dates and/or places, try to
document either a circa birth date and birth place (birth state
only is fine) OR a death date and death/burial place for each
person in each generation.
After adding all the established children listed in the patriot's
profile to your
tree, look for additional children of the patriot (i.e.,
children that are not listed in the DAR Ancestor Database).
To find all the children in each generation, search
Ancestry's Public Member Trees by typing 1)
a last name in the Last Name box, 2) a first name for the
Father, and 3) a first name AND maiden name for the Mother.
Leave everything else blank. If there are possible
spelling issues, use the asterisk for a wild-card search.
If you are able to document a link
between the patriot and additional children through records such
as wills, deeds, church records, guardianships etc., add
the other children to your tree and attach or link the documents to your tree.
IMPORTANT NOTE:
Only
add children and grandchildren of the patriot to your tree that
are EITHER 1) already proven on a previous DAR application, OR
2) have documentation that prove a parent-child relationship.
In
order to keep from getting confused, it is best to use a
systematic approach for adding people to your tree. I
suggest adding everyone in each generation before moving to the
next generation. In other words, add all the patriot's
provable children. After adding all the patriots provable
children, add all the patriot's provable grandchildren.
After adding all the patriot's provable grandchildren, add all
the patriot's provable great-grandchildren. Also, when you are
finished with working on your tree, be sure to write down where
you left off so you know where to start the next time you work
on it.
Step Three: Find the Patriot's Grandchildren
After adding
and documenting all the provable children of your patriot to
your tree, the
next step is to start working on all the provable grandchildren
of your patriot. Start with the patriot's oldest child,
and document his/her proven children. There are two ways
to find all the proven children of a child of the patriot (i.e.,
patriot's proven grandchildren), and you should use both methods.
1)
If the patriot's child is an established child of the patriot, go to the DAR Ancestor Database and
click the little purple D next
to each application for that child in
the patriot's profile.
2) Go
to the
DAR Descendants Database Advanced Search page and
search on the patriot's child name and the name of his/her
spouse. This strategy is important because a patriot's
grandchild may be linked to his/her parents on an application
for a DIFFERENT patriot (i.e., not the patriot you are
researching). Use the wild-card search for spelling
issues.
After identifying all the established grandchildren of the
patriot, look for additional grandchildren that are not listed
in the DAR databases. Search Ancestry's Public Member
Trees using the same strategy as
before
(i.e., last name, father's first
name, mother's first name, and mother's maiden name). To document grandchildren that are not in the DAR databases,
attach or link wills, deeds, vital records, county histories,
church records, guardianships, etc. to your tree.
After adding all the provable children of the patriot's oldest
child, next add all the provable children of the patriot's
second child. After adding all the provable children of the
patriot's second child, add all the provable children of the
patriot's third child and so on. Again, only add children and grandchildren of
the patriot to your tree that are EITHER 1) already proven on a
previous DAR application, OR 2) have documentation that prove a
parent-child relationship.
Step 4: Find the Patriot's Great-Grandchildren, GG-Grandchildren,
GGG-Grandchildren, etc.
To
find all the children of each couple in each generation, search
Ancestry's Public Member Trees with
the last name, father's first name, mother's first name, and
mother's maiden name. Be sure to mark each direct descendant in
each generation as (Child of DAR Patriot), (Grandchild of
DAR Patriot), (Great-Grandchild of DAR Patriot), (GG-Grandchild
of DAR Patriot) etc.
Once
you reach the patriot's great-grandchildren, documenting
parent-child relationships usually becomes much easier as the
great-grandchildren are often in their parents' household in the
1850 census. On the flip side, it starts to take a great
deal more time to complete each generation because the number of
people in your tree increases substantially. You can save
time if you avoid adding descendants to your tree that clearly
never married or never had children. For example, if a
couple married in 1905 and they do not have any children in the
1910, 1920, and 1930 censuses, do not add them to your tree.
When
you add people to your tree who were born after 1900, Ancestry
will mark them as Living.
To add a
death date, click Deceased. Even if the
person is probably deceased but you do not have an exact date of
death, mark them as Deceased.
Attaching Documents
To increase the
likelihood that a person will appear in the results of an Ancestry
Public Member Tree database search, attach at least one Ancestry record to that person. Thus, always try to attach at
least one Ancestry.com record to both
the husband and wife in
each generation in your tree. When attaching census
records and marriage records listing both the husband and wife,
attach the records to
both of them at the same time.
Adding Links to Documents
There
are many important documents and resources that are not found on
Ancestry.com. For example, Ohio death certificates from
1908-1953 are on FamilySearch and Missouri death certificates
1910-1969 are on Missouri Digital Heritage.
County and
town histories contain biographies that can establish a
parent-child relationship. When you find helpful resources
that are not Ancestry.com,
add a link to them to your tree.
Tips for Finding Documents
1)
When reviewing someone's Ancestry public tree that has lots of
attached records,
check the Gallery. If the owner of the tree
has scanned and uploaded records, usually they will only appear in
the Gallery.
2)
When attaching records to an individual in your tree, choose
View Record (not View Image). Review the
Suggested
Records as some of these records may also pertain
to the person. Census records generally have the most
Suggested Records.
3) To
find missing children, enter parents' names only in a
general search on FamilySearch as many birth, marriage, and death
records listing parents have been indexed. Leave the
Deceased Ancestor's Name fields blank.
Uploading a Scanned Document
You
may want to
upload a document such as an obituary or death
certificate. You can also make that document appear on the
person's main page as the profile photo so that it catches the
attention of visitors to the page. It is best to upload
.jpg files rather .pdf files.
Adding Comments and Notes
You
will want to
add Comments and Notes to your tree. Comments
are open to the public to view. Notes are only viewable by
the owner of the tree. Consider adding this comment for your DAR
Patriot in your tree, "He has been accepted by the Daughters of the American Revolution
(DAR) as a Revolutionary War patriot. His descendants are
eligible to join the DAR or SAR."
Finding Obituaries
Obituaries are extremely important in this project, especially
for the recent generations. Be sure to check Find-A-Grave
memorials for people in your tree as obituaries are often posted
there. Many obituaries from about 2005 to the present are
available online for free. If the death was 2005 -
present, search Google with the person's name and death year.
Add a city name to the search if needed. In addition, there are links
to many free newspapers and obituaries
on
this page.
If
you find an obituary, add a link to the obituary to your tree
(see Adding Links to Documents above). Also copy and paste the
text of the obituary into a Note so you have the text of the
obituary if the link is no longer active in the future.
(See Adding Comments and Notes above.) If you decide to
paste the text of the obituary in a Comment (open to public
view) rather than a Note (private), be aware that there
is
a
character limit for Comments. You will probably
need to edit the obituary. If you find an obituary in an
online
newspaper,
follow
these steps to upload it to your tree.
1st Cousins vs. 2nd Cousins vs. 2nd Cousins Once Removed
For every direct descendant of your patriot in your Ancestry
tree, the person's profile will
indicate
how they
are related to you. It is easy to
understand the difference between 1st cousins, 2nd cousins, 2nd
cousins once removed etc. without charts or other aids.
For example, if your closest shared relatives with another
individual are your Grandparents and they are also the
Grandparents of the other individual, you are 1st cousins.
However, if your Grandparents are the Great-Grandparents of the
other individual, you are 1st cousins once removed. If
your closest shared relatives are your Great-Grandparents and
they are also the Great-Grandparents of the other individual,
you are 2nd cousins. However, if your Great-Grandparents
are the Great-Great-Grandparents of the other individual, you
are 2nd cousins once removed.
*
First cousins share Grandparents
*
Second cousins share Great-Grandparents
*
Third cousins share GG-Grandparents
*
Fourth cousins share GGG-Grandparents * Fifth cousins share GGGG-Grandparents
* Sixth cousins share GGGGG-Grandparents
When two
individuals are not on the same level (e.g., GG-Grandparents for
one person are GGGG-Grandparents for another person), the person
closest to the common ancestors (e.g., GG-Grandparents)
determines the cousin number (e.g., 3rd cousins). The
number of generations that the two are separated determines the
number of removes (e.g., 2 times removed). Thus, if the closest
shared ancestors are the GG-Grandparents of someone in your tree
but they are your GGGG-Grandparents, then you are 3rd cousins 2
times removed.
My patriot Rebecca Waldron Yates and her husband Johannes
Yates are the GGGG-Grandparents of Eleanor Roosevelt.
Rebecca and Johannes are my GGGGGG-Grandparents. Because
Eleanor is closest to our common ancestors, she determines the
cousin number (5th cousins). Because we are separated by
two generations, we are 5th cousins 2 times
removed.
|
|
|
|
|
You Have Taken a DNA
Test.
Now What
Do You Do?
|
|
|
|
|
|
If
you have taken a DNA test and are wondering what to do next, watch this
interesting video from FamilySearch. It
provides an easy-to-understand overview of reviewing and
clustering DNA matches, how to use DNA to support hypothesized
parent-child relationships, and how to identify biological
parents in cases of unknown parentage (i.e., adoptees). NOTE:
The video is divided into 6 segments. After watching a
segment, click the link to the next segment in the box to the
left of the video. After clicking the link to the next segment,
click the start arrow on the video to start the video. For
an introductory video about DNA and genetic genealogy (e.g.,
what is DNA, why is DNA valuable, what are the different types
of DNA, what is the value of X-DNA,
what does each testing
company offer, etc.),
watch this video.
Ancestry DNA Matches
Ancestry has the largest DNA database
with nearly 15 million people. If you have tested with
Ancestry, the first thing to do
after you receive notification that your DNA kit has been
processed is to
link your DNA to yourself on your
Ancestry tree. Many people fail to do this
important step, and you will notice this in your DNA matches when
it says
Unlinked Tree. (NOTE: If you
do not have a tree on Ancestry, you will need to build one and
then link your DNA to yourself on
the tree.)
Next,
review
your DNA matches.
Crista Cowan's video
on viewing and organizing your DNA matches is informative. Crista has a color-coded system for organizing her DNA matches
within her Ancestry account. Another idea is to develop an
Excel spreadsheet of your matches.
In my
Excel spreadsheet, I list all of my matches that
I have identified, and I link them to their Ancestry tree in my
spreadsheet. I also add them to my tree and link them to
my tree in the spreadsheet. For each match, I list the
Most Recent Common Ancestor (MRCA) that we share, the child of
the ancestor in their lineage, how they are related to me (2nd
cousin, 3rd cousin once removed, etc.) and the number of
centiMorgans (cM) that we share.
(In general, the more cM that you share with a match,
the more closely you are
related.)
Ancestry's ThruLines
To
figure out how your matches might be genetically related to you,
use Ancestry's
ThruLines. Ancestry uses a combination of
your tree and the tree of your DNA match to offer a suggested
relationship. If gaps remain in those two trees, Ancestry
attempts to fill the gaps using the millions of trees in its
database. Thus, the suggested connections should be used
WITH CAUTION. It is
very important to gather records to
confirm or disprove the
connections.
This video explains
how to use ThruLines.
Organizing Shared Matches
Once
you have identified how some of your matches are related to you,
you can use
Shared Matches to
find matches that are related to you and another known
match. For example, I know that R.H. and I are both
descendants of John Hecht and Maria Krueger. By clicking
on Shared Matches, Ancestry lists the
matches that
share DNA with me and with R.H. Keep in
mind that some of matches in the shared-match list may not share the
same DNA with you and your known match. In other words,
some of the matches may be related to you through one line and
related to your known match through a different line.
Develop a coding system for your Ancestry matches using
different colors representing each of your 8 great-grandparents
(or your 16 great-great grandparents) similar to
Crista Cowan's method. (Video is also linked above). This is a good strategy for
figuring out how matches that do not have trees may be related
to you.
Click here for an
example. For instructions on creating color-coded groups
for your Ancestry matches,
click here. For another way to
visually organize your shared matches, try the
Leeds Color Clustering Method.
Read these additional articles about using the Leeds Method:
Article 2,
Article 3, and
Article 4.
Test Your Close Relatives
Next, consider DNA testing for your living relatives especially
older relatives in your parents' or grandparents' generations.
For example, if your father and/or your mother are still living,
ask them to test. If your parents are deceased but their
siblings are still living (your aunts and uncles), contact them
about testing. If you do not have any living older
relatives, ask your brothers, sisters, and cousins to test.
Ancestry frequently offers their DNA kits at a significant
discount.
Downloading Your Raw DNA Data
After
testing at Ancestry (or 23andMe), you can
download your raw DNA data and upload it to FamilyTreeDNA,
GEDmatch, AND MyHeritage FOR FREE.
The benefits of this include: 1) access to matches who have
tested at other companies and 2) access to a
chromosome browser
which shows exactly where you match your relatives on each
chromosome (FREE at GEDmatch and a one-time fee of $19.00 at FamilyTreeDNA).
NOTE: When downloading your raw DNA data file, be sure
to access your email account on a computer rather than a phone.
If you access your email on a phone, the raw data will download
to your phone. IMPORTANT:
Leave the downloaded the file as it is (i.e., zipped). Do NOT unzip the
file. Do NOT change the
file name.
Uploading Your DNA Data FOR FREE to FamilyTreeDNA,
GEDmatch,
and MyHeritage
For
instructions on uploading your DNA data to FamilyTreeDNA,
1)
click this link, 2) scroll
down the page, and 3) under the heading "How to Transfer Your
Autosomal DNA Results" click New Customers. You
should see detailed instructions with images. After
you upload your DNA data and review your FamilyTreeDNA matches, you can pay a one-time
fee of $19.00 to unlock the chromosome browser and ethnicity
information. For instructions on this, 1)
click this link, 2) scroll
down to Frequently Asked Questions, and 3) click the question
"How do I unlock the Chromosome Browser, myOrigins, and
ancientOrigins?." If you are a DAR member or a close
relative, you can
join the
NSDAR DNA Project on
FamilyTreeDNA. For instructions on finding your DNA matches
within the NSDAR DNA Project,
click here. After joining the NSDAR DNA Project,
DAR members
can join the
NSDAR DNA Project Facebook Group.
For
instructions on uploading your DNA data to GEDmatch,
click this
link. Be sure to write down your kit number
at the end of the upload process. NOTE: If
you are already a GEDmatch user and you have not yet made a
decision about whether to Opt-In to law enforcement matching for
violent crimes, consider viewing
Video 1 and
Video 2 for more
information.
For
instructions on uploading your DNA data to MyHeritage,
click
this link.
Using FamilyTreeDNA & GEDmatch
For
an introduction to using FamilyTreeDNA's Family Finder tools,
watch
Video 1 and
Video 2. (NOTE:
These videos are several years old. There is no longer a
fee to transfer your DNA data to FamilyTreeDNA. Also, the
interface has changed somewhat.)
This article also
explains the tools at FamilyTreeDNA.
GEDmatch has a number of tools for finding your cousins and
studying your DNA matches. For information on the
One-to-Many tool for viewing your match list,
watch this video.
After you locate an interesting match, the One-to-One tool
provides detailed information about that specific match using a
chromosome browser. For information on how to use the
One-to-One tool,
watch this video.
A third tool called "People who match both, or 1 of 2 kits"
works like "Shared Matches" on Ancestry, but this tool also
shows the people that the two matches do NOT share in common.
Watch this video to
learn how to use this tool. Although most
people on GEDmatch do not have family trees, there will be trees
available for some of your matches. For instructions on
viewing the trees of your matches,
click here.
X Matches
Both
FamilyTreeDNA and GEDmatch offer the ability to review your
matches on the X chromosome. Because fathers cannot pass
an X chromosome to their sons, the possible ancestors for an X
match are more limited. Thus, when trying to determine a common
ancestor with someone who matches on the X chromosome, you can
immediately rule out a number of your ancestors.
This article explains
the unique inheritance pattern of the X chromosome and provides charts
for determining possible ancestors for an X match.
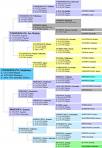
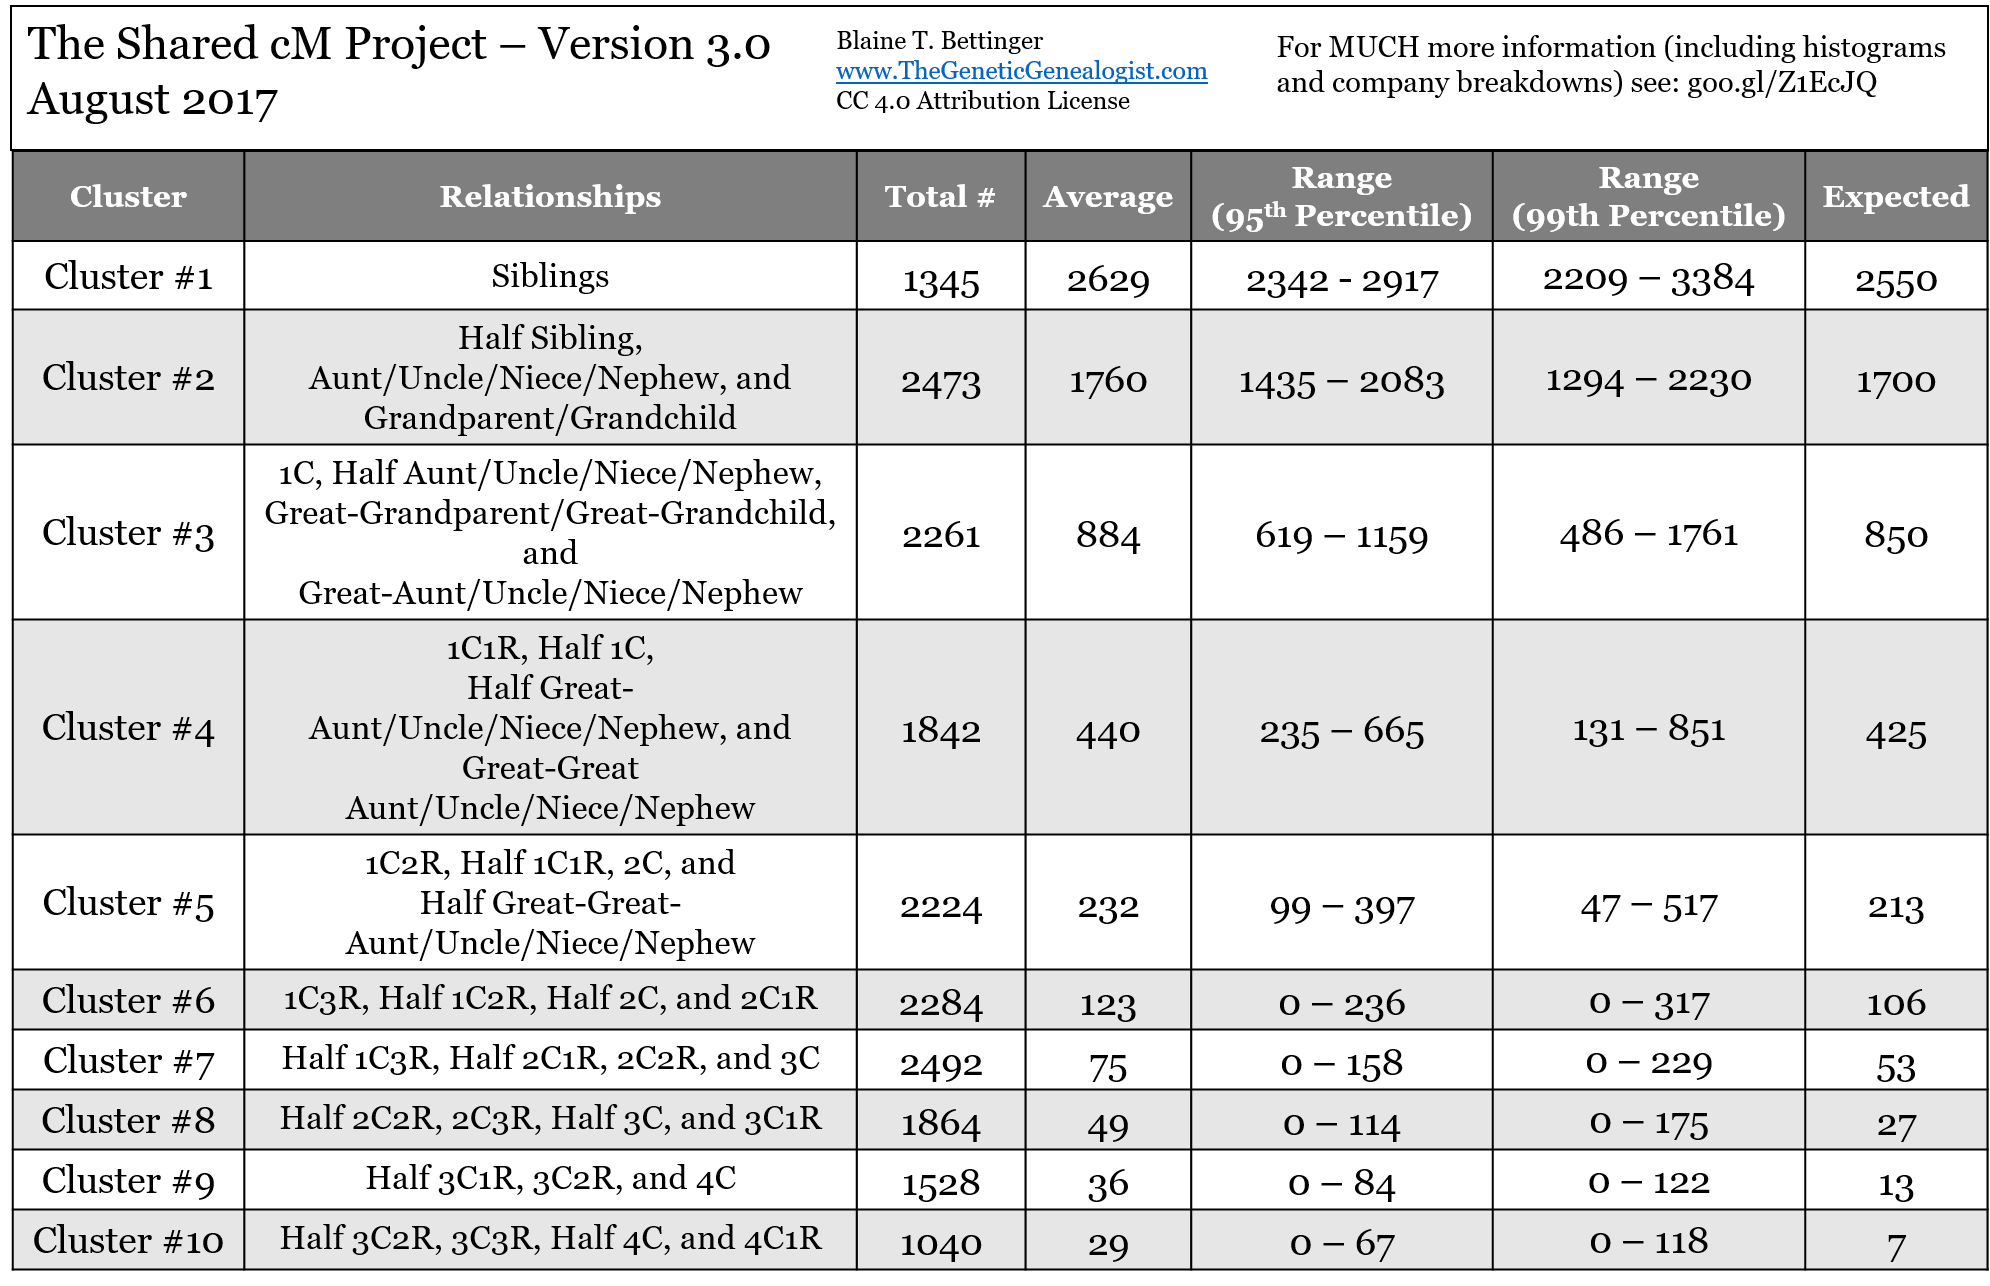
Shared cM Project Chart
The
DNA testing companies provide information on how much DNA you share with a
match in terms of centiMorgans (cM). A cM is a unit of
measure for DNA. In general, the more DNA you share with a
match, the higher the cM number will be and the more closely you
will be related.
The Shared cM Project Chart
can help you determine a likely relationship between you and a
match based on the number of shared cM (e.g., 1st cousin, 2nd
cousin twice removed, 3rd cousin, etc.). For example, I
share 220 cM with a match.
The Shared cM Chart
indicates the relationship will most likely be in Cluster #5.
The
Shared cM Project tool
on the DNA Painter site calculates the probable relationship for
you based on the total number of
shared cM.
Uploading Your Family Tree to FamilyTreeDNA & GEDmatch
Once
you have uploaded your DNA data to FamilyTreeDNA and/or GEDmatch,
consider also uploading a GEDCOM file of your family tree.
It can be difficult to identify how a
match is related to you on FamilyTreeDNA and GEDmatch because only a
portion of the people in these databases have added their trees.
If you have a large tree on Ancestry or in a genealogy software
program on your computer, you may want to create another smaller tree with just your direct ancestors for uploading to FamilyTreeDNA
and GEDmatch (i.e., yourself, your parents, your 4
grandparents, your 8 great-grandparents, etc.).
IMPORTANT: GEDmatch does NOT remove information on
living people. Before downloading your tree, remove the
names of all living people and replace their names with their
initials. Mark them as living and remove their birth
dates. (You can add this information back into your
Ancestry tree after you download it.) If you have a
family tree on Ancestry,
click this link for instructions on how to download
the GEDCOM file of your tree.
For
instructions on uploading a GEDCOM file of your family tree to FamilyTreeDNA,
click this link.
For
instructions on uploading a GEDCOM file of your family tree to GEDmatch,
click this link.
Once you have uploaded your family tree to GEDmatch,
watch this video on
how to compare family trees on GEDmatch.
Dealing with Matches With No Family Trees
One
of the most frustrating issues concerning DNA is finding a close
match that has no family tree.
This presentation from Rootstech
offers many excellent suggestions on how to overcome this
problem. When a match has a tree with one or two names,
another helpful strategy is to build a "quick
and dirty tree." If you would also like to
watch the video recommended in the quick-and-dirty-tree
presentation,
click here.
NOTE: This video by Crista Cowan is older than the
videos linked above in this article. The Ancestry
interface has changed. |
|
|
|
|
Locating Land Records (i.e., Deeds)
to Document Early Generations
|
|
|
|
|
|
When a will/probate record, county/town history, or vital record
is not available, usually a deed is the next record to seek out
for evidence of an parent-child relationship. Most deeds
are recorded at the county level. Microfilms of these
records can be ordered from your local Family History Center.
Begin
by looking for deeds
in the counties where the PARENT resided. Because some
deeds were recorded years after the actual transaction, look for
deeds well beyond the time period of the ancestor's residence.
If you do not locate a deed where the parent resided and the
child resided in a different county, look for a deed where the
child resided.
In the
Family History Library Catalog,
deed records are categorized under Land and Property.
When researching deeds, it is usually necessary to first order
one of the following "master" indexes:
* Grantor
Index
* Grantee Index
* General Index to Deeds
The Grantor is the person giving or
selling the property. The Grantee is the person receiving
or buying the property. Counties usually have BOTH the
Grantor and Grantee Indexes (example1
and
example2), OR
they have a General Index to Deeds (example).
When both the Grantor and Grantee
Indexes are available, I recommend searching both because, through human error,
deeds may have been indexed in one but not the other.
NOTE: Unfortunately, not all counties have a "master"
index (example).
Usually when there is no "master" index, the index for each deed
book is located either in the front or the back of each book on
the microfilm.
When reviewing the deed index, look
for 3 specific types of listings:
* the
parent as Grantor and the child as Grantee
* the parent as Grantor and any person with the designation of
et al.
as
Grantee---especially if they have the same surname
* any person listed as Grantor with: 1) the surname of interest
AND
2) the
designation of et al.
The term et al. is
Latin for "and others." In the deed index, usually only
the first person listed on the deed appears in the index.
An et al. listing in the index may refer to a
deed that lists several, or perhaps all, of the children/heirs.
If the et al. listing appears in the Grantor
column, it may indicate a deed in which the heirs are selling a
piece of property that they inherited from the parent.
If you locate a deed, write down the
volume/book, page, and year. NOTE: When reviewing
the index, it is especially important to make note of the PAGE
number so that you do not have to view 500 images to find your
deed on the microfilm.
Once you have the volume/book, page,
and year information, you will need to review the particular microfilm containing the deed. Deeds
usually do not state a parent-child relationship. Thus,
other evidence is usually needed in conjunction with the deed to
document the parent-child connection. However, DAR will
accept a deed as proof of parentage if the deed uses the key
words of "love and affection."
|
|
|
|
|
Revolutionary War
Pension Claims:
The Best Resource
You Are Not Using |
|
|
|
|
|
The 80,000 federal Revolutionary War pension claims filed by
soldiers, widows, and surviving children contain a great deal of
genealogical information. These claims are available
through
Ancestry.com and
Fold3.com, and
they should be routinely
checked whenever anyone is seeking to establish a new patriot or
to prove a new child of a patriot.
What Is In a
Revolutionary War Pension Claim?
Original Bible records listing the names and birth dates
of all the soldier’s children are often contained in these
claims. However, there are several other types of
documents in pension files that can establish parent-child
relationships:
1) Affidavits by one or more children indicating their status
as a son or daughter of the soldier
2) Affidavits by others listing some, or all, of the soldier’s
children
3) Claims filed by the surviving children of the soldier which
often list daughters by their married names
4) An 1820 estate schedule that lists all the people in the
soldier’s household by name and age (in essence this is an 1850
census in 1820).
Three Types of
Pension Claims
There are 3 types of claims. Claims designated with an S
(for Survivor) were filed by the soldier. Claims
designated with a W (for Widow) were filed by a widow. If
the soldier filed a claim before his death and his widow filed
one later, the soldier’s documents will be combined with the
widow’s claim under the W designation. The S claims and
the W claims received pensions from the government.
However, claims designated with an R were rejected. If
surviving children filed a claim, their documents will be
combined with the S claim, the W claim, or the R claim,
whichever claim pertains to them.
How Do I Know if the
Revolutionary War Soldier Had a Pension?
That is the big question, and there is no straightforward
answer. Do not rely solely on the DAR Patriot Index as it
often does NOT indicate a pension when one actually does exist.
Of course, one strategy would be to check the pensions on
Ancestry.com or
Fold3.com
for every soldier, but that strategy may not always be
practical. Another strategy would be to check my
Bible Records Index
as I am listing pensions that identify 3 or more
children regardless of whether a Bible record is included.
A Little History
It is helpful to know a little about the history of our
Revolutionary War pension laws. For the first time in
1818, soldiers in need of assistance who had served in a
Continental military organization (not militia) for 9 months or
until the end of the war were eligible for a pension without
regard to disabilities. Prior to 1818, most of the pension
acts limited pensions to those disabled during service, and the
majority of the early claims were destroyed by fires in 1800 and
1814. Thus, one might think that a soldier had to live
until at least 1818 for a pension claim to exist. However,
if his widow lived a long life, a soldier who died in 1785 could
have a pension file with valuable genealogical information.
As a result of the pension act of 1818, the Federal Government
was overwhelmed with applications, and many of the approved
claims (over 20,000) were for soldiers who were not in financial
need. Thus, in 1820 Congress passed a law that required
pensioners to submit a certified schedule of their estate and
income. The genealogical benefit to the 1820 legislation
is that pensioners frequently identified all the people living
in their household by name and age.
In 1832, Congress opened up pension eligibility to veterans who
had served at least 6 months in the militia or state troops.
Over 33,000 soldiers were granted pensions.
In 1836, widows of veterans eligible under the act of 1832 were
allowed pensions if they had married the veteran before the
expiration of his last period of service. In 1838, the
marriage date was extended to marriages taking place before
1794. Ten years later the marriage date was extended
to marriages before 1800. Finally, in 1853, Congress
removed all restrictions regarding the date of marriage, and
widows whose husbands had served at least two weeks were
eligible.
Rules of Thumb
Below
are the rules of thumb that I use to identify a possible pension
for a Revolutionary War patriot.
1) If a soldier served in the Continental line and lived
to 1818, he could have had a pension.
2)
If
a soldier served in the militia and lived to 1832, he could have
had a pension.
3)
If
the final wife of any deceased soldier (Continental line or
militia) lived to 1838, she could have had a pension.
Proof of Marriage
The marriage date requirement for widows’ pensions is important
for understanding who might have filed a pension and why certain
documents were often submitted with a claim. Widows had to
prove their marriage date. One way to do this was to
submit a Bible record that listed the marriage date and/or the
birth dates of the children. Another way was to ask
friends, neighbors, or family members to testify that they had
first-hand knowledge of the widow’s marriage date and/or birth
dates of her children (especially the oldest children).
From 1838 to 1848, widows had to claim pensions based on
marriages that took place before 1794. Thus, it is common
to see widows with multiple marriages claiming pensions for the
service of their FIRST husbands even when subsequent husbands
also served. Of course, some widows whose husbands died
young never remarried, and they filed pensions some 40-50 years
after the soldier’s death. Thus, many widows’ pensions
exist for soldiers who died well before the pension act of 1818.
|
|
|
|
|
Notes on Guardianships and Church Records |
|
|
|
|
|
Guardianships
When someone with minor children died leaving an estate that
required administration or probate, the court appointed a
guardian to act in the children’s interests. If the child
was over 14 but under 21, the child could select his/her own
guardian. These records can continue for many years as the
guardians appeared in court regularly to report on the
administration of their charges financial affairs. When
the child came of age, a final accounting was submitted to the
court.
NOTE: The term "infant" refers to any minor under the
age of majority (usually 21 for males and 18 for females).
Do not assume that the child is a baby.
Guardianships are usually found with
probate records. Sometimes they are within the actual will books
along with the wills and other probate records (see
Davidson County, TN
and
example)
and sometimes they are organized separately (e.g., see
Clinton County, NY).
When reviewing the index, be aware that the guardianship could
be listed in one of three different ways. First, look for
the name of the minor child of interest. Second, look for
any guardianship with the surname of interest and the
designation of
et al. This means that more than one child
is mentioned in the guardianship record, and often only the
first child mentioned in the record is listed in the index.
Third, look for the name of the deceased parent.
Church Records
Church records are usually found at
the town, township, or city level. However, you should
also check for them at the county level in the Family History
Library Catalog.
In addition to looking for baptisms,
marriages, and deaths, pay attention to the membership records.
When a new member transfers into a church, the previous church
is usually listed. Armed with that information, you can
then search the records of the previous church. This
might then lead you to the baptismal, marriage, and death
records of your
ancestor's parents.
|
|
|
|
|
Tips on Documenting
Lineages to Quebec Patriots |
|
|
|
|
|
Documenting Quebec lineages is often
an easy endeavor. Baptismal records and marriage records (first
marriages only) list the parents’ names. If the marriage is a
second or third marriage, the marriage record will list the name
of the previous spouse rather the parents. It will be necessary
to work back to the first marriage record for the parents’
names. Burial records list the age of the deceased and the
spouse’s name. Women keep their maiden names in the
records throughout their lives. Finally, all baptisms,
marriages, and burials from 1621 to 1849 in Quebec are
indexed at the Programme De Recherche En Demographie Historique
aka
PRDH.
NOTE: PRDH is a subscription site, but you can
search the records for FREE.
Quebec Catholic church records are available
on Ancestry.com and FamilySearch. The Ancestry database for
these records is
Quebec, Canada Vital & Church Records (Drouin Collection)
1621-1968. These records are indexed. However,
some of the records are nearly illegible. If the image on
Ancestry is difficult to read, you can browse the images on
FamilySearch. The FamilySearch database for these records is
Quebec Catholic Parish Registers 1621-1979.
You will need to know the date and place as these records are
NOT indexed.
DAR does NOT need translations of
the records as they have genealogists that can read French.
However, you must underline in red all pertinent names, dates,
and places.
When documenting places, keep in
mind the following:
* The correct abbreviation for
Canada is CD.* Quebec did not become a Province until 1774.
Places before 1774 should be listed as Parish/City name, CD (e.g., St Vallier, CD).
* From 1774 to 1790, places should be listed as Parish/City name,
Quebec, CD (e.g., St Vallier, Quebec, CD). * Quebec became
Lower Canada in 1791. From 1791 to 1840, places should be
listed as Parish/City name, Lower Canada, CD (e.g., St Vallier, Lower
Canada, CD).
* Lower Canada became Canada East in 1841. From 1841 to 1866,
places should be listed as Parish/City name, Canada East, CD (e.g.,
St Vallier, Canada East, CD).
* Canada East became Quebec in 1867. From 1867 to the present,
places should be listed as Parish/City name, Quebec, CD (e.g., St Vallier, Quebec, CD).
When citing Quebec Catholic records
on page 3 of an application, I cite them this way for example:
Gen 6:
Baptism, Baptism, & Burial in Quebec
Vital & Church Records 1621-1968 on Ancestry
Burial & Marriage in
Quebec Catholic Parish Registers 1621-1979 on FamilySearch
Gen 7:
Baptism & Baptism in
Quebec Catholic Parish Registers 1621-1979 on FamilySearch
Burial, Burial, 1st Marriage, & 2nd Marriage in Quebec Vital &
Church Records 1621-1968 on Ancestry
If you need assistance documenting
the lineage or understanding Quebec records, I am happy to
help. Contact me at
debduay@yahoo.com. I will review the Quebec lineage,
and attach the baptismal, marriage, and burial records for each
generation to my public tree on Ancestry.com. You can see an
example of this for patriot
Francois Etienne Nadeau.
You can find additional help
with translating Quebec
baptismal records,
marriage records and
burial records at these links to the Maple Stars and
Stripes podcast. Also,
click here for a French genealogical word list, and be
sure to scroll all the way to the bottom for translations for numbers, dates, and
times. |
|
|
|
|
Stop
Waiting for a Knock at the Door |
|
|
|
|
|
Traditionally, DAR chapters have
focused on two main groups of
prospective members:
1) those with a relative
who is already a member
2) those that have researched
their own genealogy.
Yet,
these two groups represent a
very small percentage of the population that is eligible to
join our organization. Indeed, the vast majority of
eligible ladies have NO IDEA of their eligibility.
In the first 100 years of our
organization, documenting one's lineage from a Revolutionary
War patriot was often a monumental task that took many years
of research to complete. With the amount of time and
effort required to submit an application, most DAR chapters
had no choice but to wait for eligible prospective members
to approach them. Today, however, the Internet has
completely changed the world of genealogy. With so
many resources available at the touch of our finger tips, it
is no longer necessary to wait for prospective members
knowledgeable about their ancestry to come calling.
With a few simple websites, it is often easy to find and
document the Revolutionary War patriot ancestors hidden in
the lineages of women who know very little about their
genealogy beyond their grandparents or great-grandparents.
Thus, today we should be taking
a much more proactive approach to recruitment than ever
before. Instead of focusing solely on prospective
members knowledgeable about their family tree, we should be
recruiting interesting women active in other organizations
in our communities who have never even thought their
genealogy -- much less researched it. When we meet a
woman in the garden club or at church who we believe would
be an asset to our chapter, we should be telling her about
the DAR and asking her, "Would you be interested in joining
the DAR if we can find a Revolutionary War patriot ancestor
in your lineage?" We should avoid asking the more
traditional question of "Are you eligible to join the
DAR?" as it automatically limits our potential members to
the small percentage of women in the two categories
described above.
Of course, this idea of
proactively recruiting outstanding women in our communities
and essentially serving as their genealogists throughout the
research process is a major shift in thinking for many DAR
members. And certainly not everyone will agree with
this idea. For instance, some DAR members may feel
that it is still too much work for chapters to take on the
responsibility of helping potential members with each and
every step in the journey. Likewise, others may
believe that prospective members will not fully appreciate
their membership if they have not experienced "the trials
and tribulations" of documenting their lineage.
As for the work load, the
short-term effort will yield HUGE long-term benefits
by providing chapters with dedicated and skilled members to
serve as chapter officers, committee chairman, community
fundraisers, and publicity specialists for years to come.
Keep in mind that the idea is to go out in the community and
find the women that you WANT and NEED to make
your chapter successful. For those concerned that DAR
membership will be taken for granted if the prospective has
not "suffered" through the application process, I believe
that there is very little reason to worry. In fact,
many of my chapter's most consistent participants are the
ladies who never had any idea of their DAR eligibility.
If incorporated gradually,
moving from a passive to an active recruitment strategy is
actually a fairly easy change. Start with your current
members. Use the connections that they already have to
recruit new members. Next, join other local
organizations such as the women's club, the garden club, or
the historical society. Offer to present a brief
genealogy program at one of their meetings.
When someone indicates
interest in the possibility of
membership, ask her to write
down her name, email address,
and phone number. Explain
that you will be sending her a
simple, one-page
Genealogy Worksheet
to complete on her parents,
grandparents, and
great-grandparents. Tell
her not to worry if
she cannot fill in every name,
date, and place.
Even if she only knows her
parents and grandparents, that's
okay.
If the potential
member has an email address, the
best way to send her the
worksheet is through an email
attachment. This way she
can either: 1) type the
information into the worksheet
using the computer (it's a Word
document) and email it back to
you, OR 2) print it out,
fill it in by hand, and mail it
back to you. If she does
not have email, you can mail the
worksheet to her.
Click here
to download the Genealogy
Worksheet. NOTE:
Be sure to put your name,
address, email address, and
phone in the "Return To:" box on
the worksheet.
Once the Genealogy Worksheet is
returned to you, start looking
for the easiest-to-prove patriot
in her lineage. For
step-by-step instructions on how
to do this, watch the 30-minute
video "How
to Find a Provable Patriot in 90 Minutes or Less."
|
|
|
|
|
|